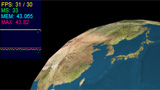
![[PV3D]地球儀3](http://www.mztm.jp/wp/wp-content/uploads/2009/07/umhr_earth3.jpg "umhr_earth3") Papervision3Dで地球儀を作ってみた。一つはSwift3DからDAEファイルを読み込んだもの、もう一つはSphereに地表の画像をマテリアルとして貼り付けたもの。
Papervision3Dで地球儀を作ってみた。一つはSwift3DからDAEファイルを読み込んだもの、もう一つはSphereに地表の画像をマテリアルとして貼り付けたもの。
DAEの地球
Swift3D ver5で球体に地表の画像を貼り付けたものをDAEで書き出した(PV3D書き出し)もの。ただし、DAEファイル内の日本語は全部アルファベットに置き換えること。
▼Wonderfl
DAEの地球 – wonderfl build flash online
DAEファイルを読み込ませるだけで、その中に記述してあるマテリアル類も自動的に読み込んで貼り付けるのはえらい。さすが。
ただ、スムージングのかけ方がわからない。
▼DAEの地球 ActionScript AS3(FP9)
|
1 2 3 4 5 6 7 8 9 10 11 12 13 14 15 16 17 18 19 20 21 22 23 24 25 26 27 28 29 30 31 32 33 34 35 36 37 38 39 40 41 42 |
/** * Copyright umhr ( http://wonderfl.net/user/umhr ) * MIT License ( http://www.opensource.org/licenses/mit-license.php ) * Downloaded from: http://wonderfl.net/c/t4tM */ /* DAEファイルを読み込む。 うーん、スムージングのかけ方がわからない。 */ package{ import org.papervision3d.view.BasicView; import org.papervision3d.objects.parsers.DAE; import flash.events.Event; import net.hires.debug.Stats; [SWF(width="465", height="465", frameRate="30", backgroundColor="0x000000")] public class Main4 extends BasicView{ private var dae:DAE; public function Main4(){ graphics.beginFill(0x000000); graphics.drawRect(0, 0, stage.stageWidth, stage.stageHeight); graphics.endFill(); dae = new DAE(); dae.load("http://mztm.jp/wonderfl/earth.dae"); scene.addChild(dae); camera.z = -1; startRendering(); addChild(new Stats()); } override protected function onRenderTick(event:Event=null):void{ var mouseY:Number = Math.min(Math.max(stage.mouseY, 0), stage.stageHeight) - stage.stageHeight / 2; dae.rotationX += mouseY / 1000; dae.localRotationY -= 0.2; super.onRenderTick(event); } } } |
関連
▼独自3Dによる実装例
http://www.mztm.jp/wp/?p=2519
http://www.mztm.jp/wp/?p=2485